Spinner Bricks - Brick Rigs Dev Blog #2
Welcome to the second Brick Rigs development blog post! This time I am going to show you how I implemented a pretty special new kind of scalable brick.
It all began when I was looking for more brick types that could be made scalable and came across mudguards. With scalable wheels being a thing now, it makes sense that there should also be fitting mudguards for all wheel sizes. However, while looking at the existing mudguard models I quickly realized that their unique shapes would’t work well with the kind of proportional scaling that scalables use. Then I thought, what if there were a better, more generalized solution to this problem? This is where the idea for spinner bricks was born. A brick that would enable arches with customizable shapes and sizes.
Mesh Generation
Unlike normal scalable bricks, I wasn’t just going to be able to apply a scaling factor to a static mesh made in Blender. In order to be able to adjust the angle of the arch, I would have to generate the mesh at runtime. The first obvious method to do this in Unreal Engine 4 was to use the UProdecuralMeshComponent, since it allows the user to display a custom mesh with custom collision.
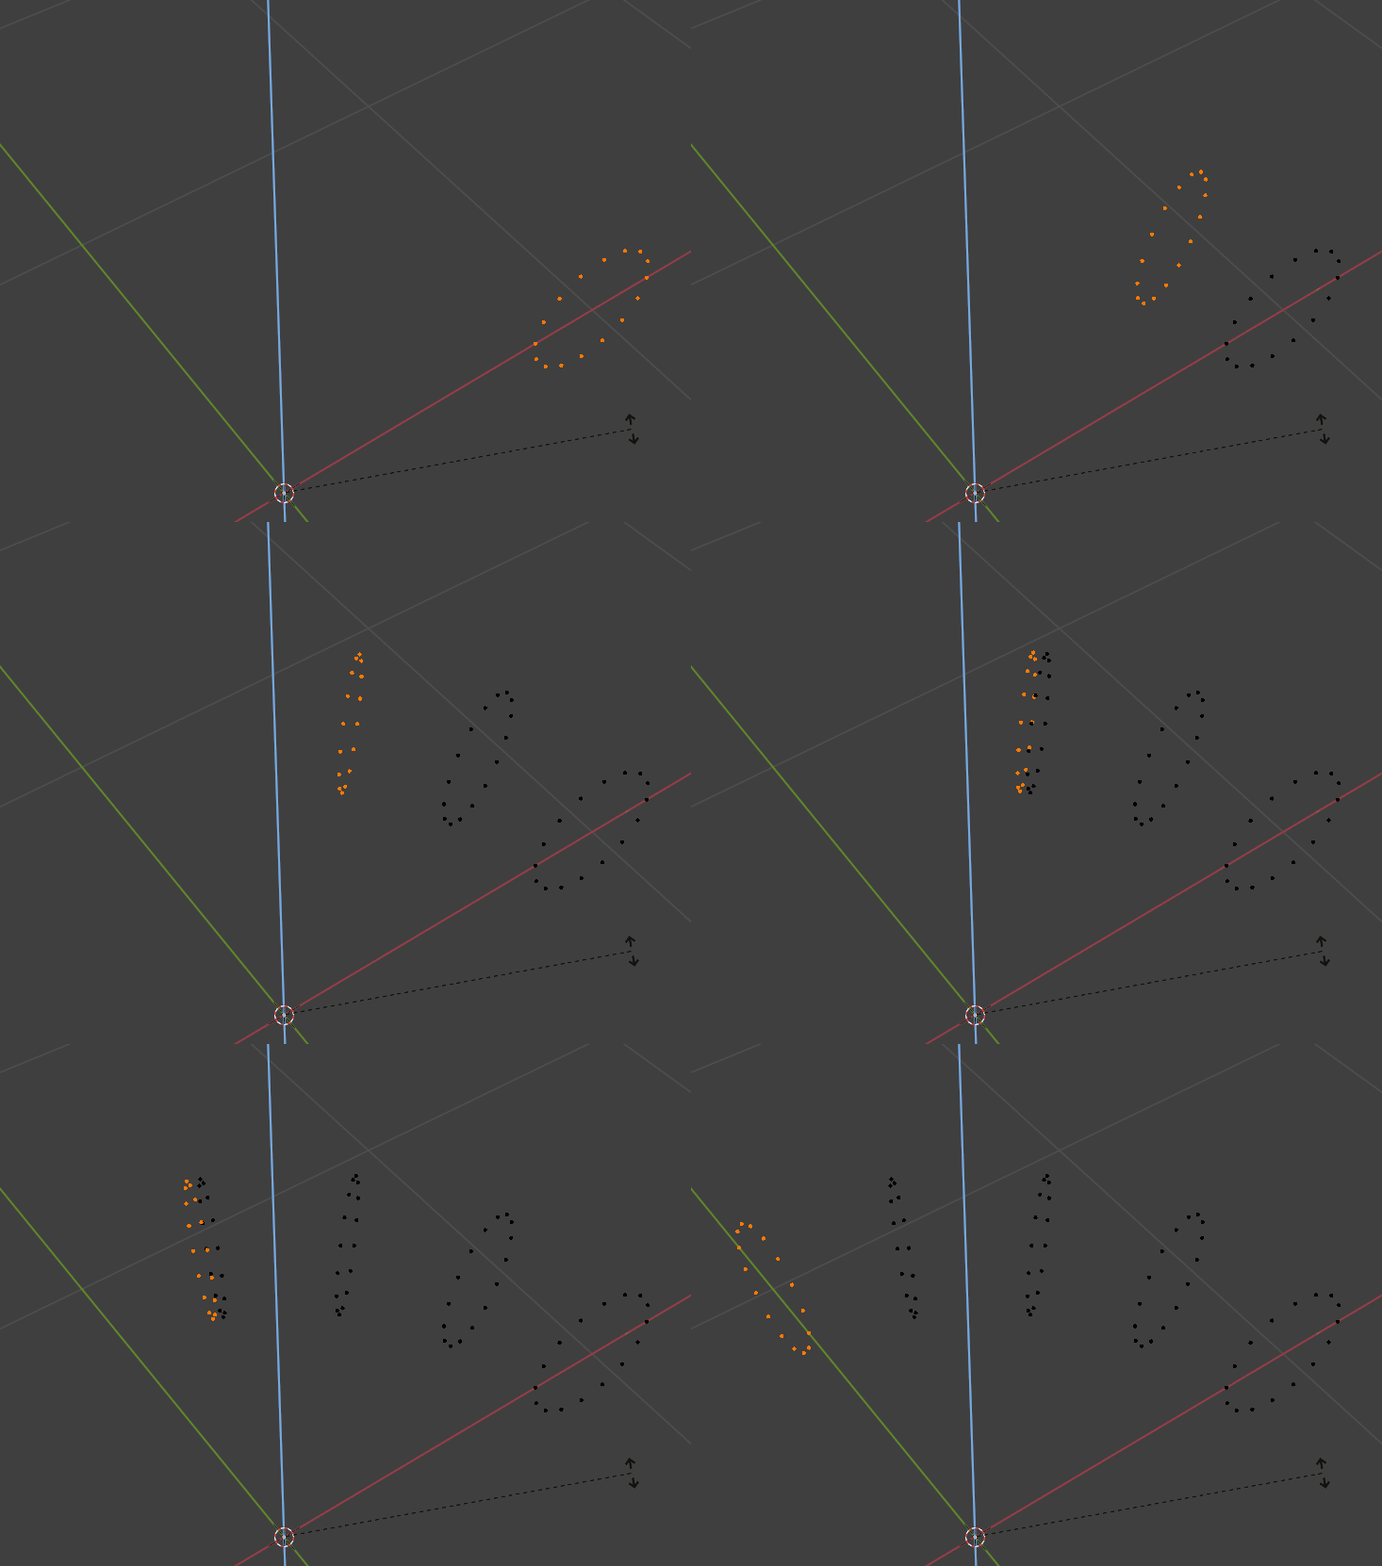
On paper, generating the mesh isn’t all that complicated. We can start with the vertices that make up the first 2D slice of the shape, then duplicate and rotate them around the pivot point a few times (visualizations done in Blender):
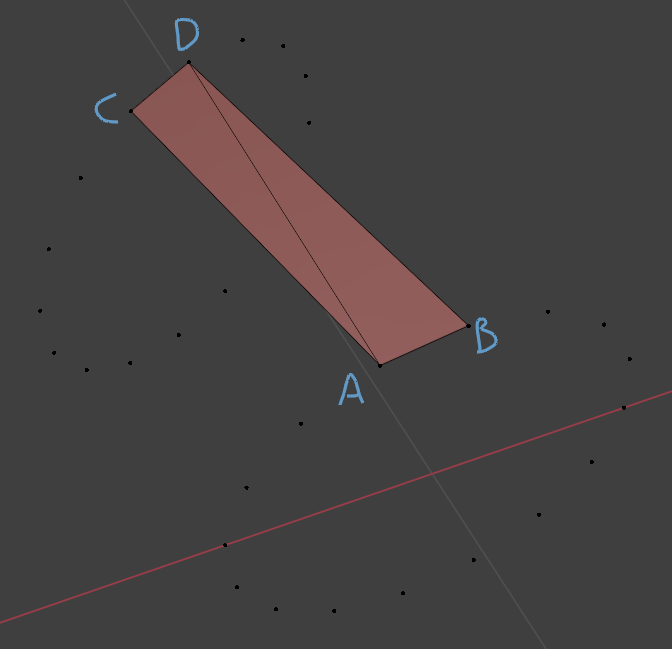
Now that we have the vertex skeleton of our mesh, we can start to fill in triangles between the slices. To do this we consider the vertices of two slices that are next to each other. Lets have a look at a vertex A, its neighbour B and their copies in the next slice, C and D. We create the first triangle between A, C and D and the second one between A, D and B.
Doing this to all slices might look something like this:
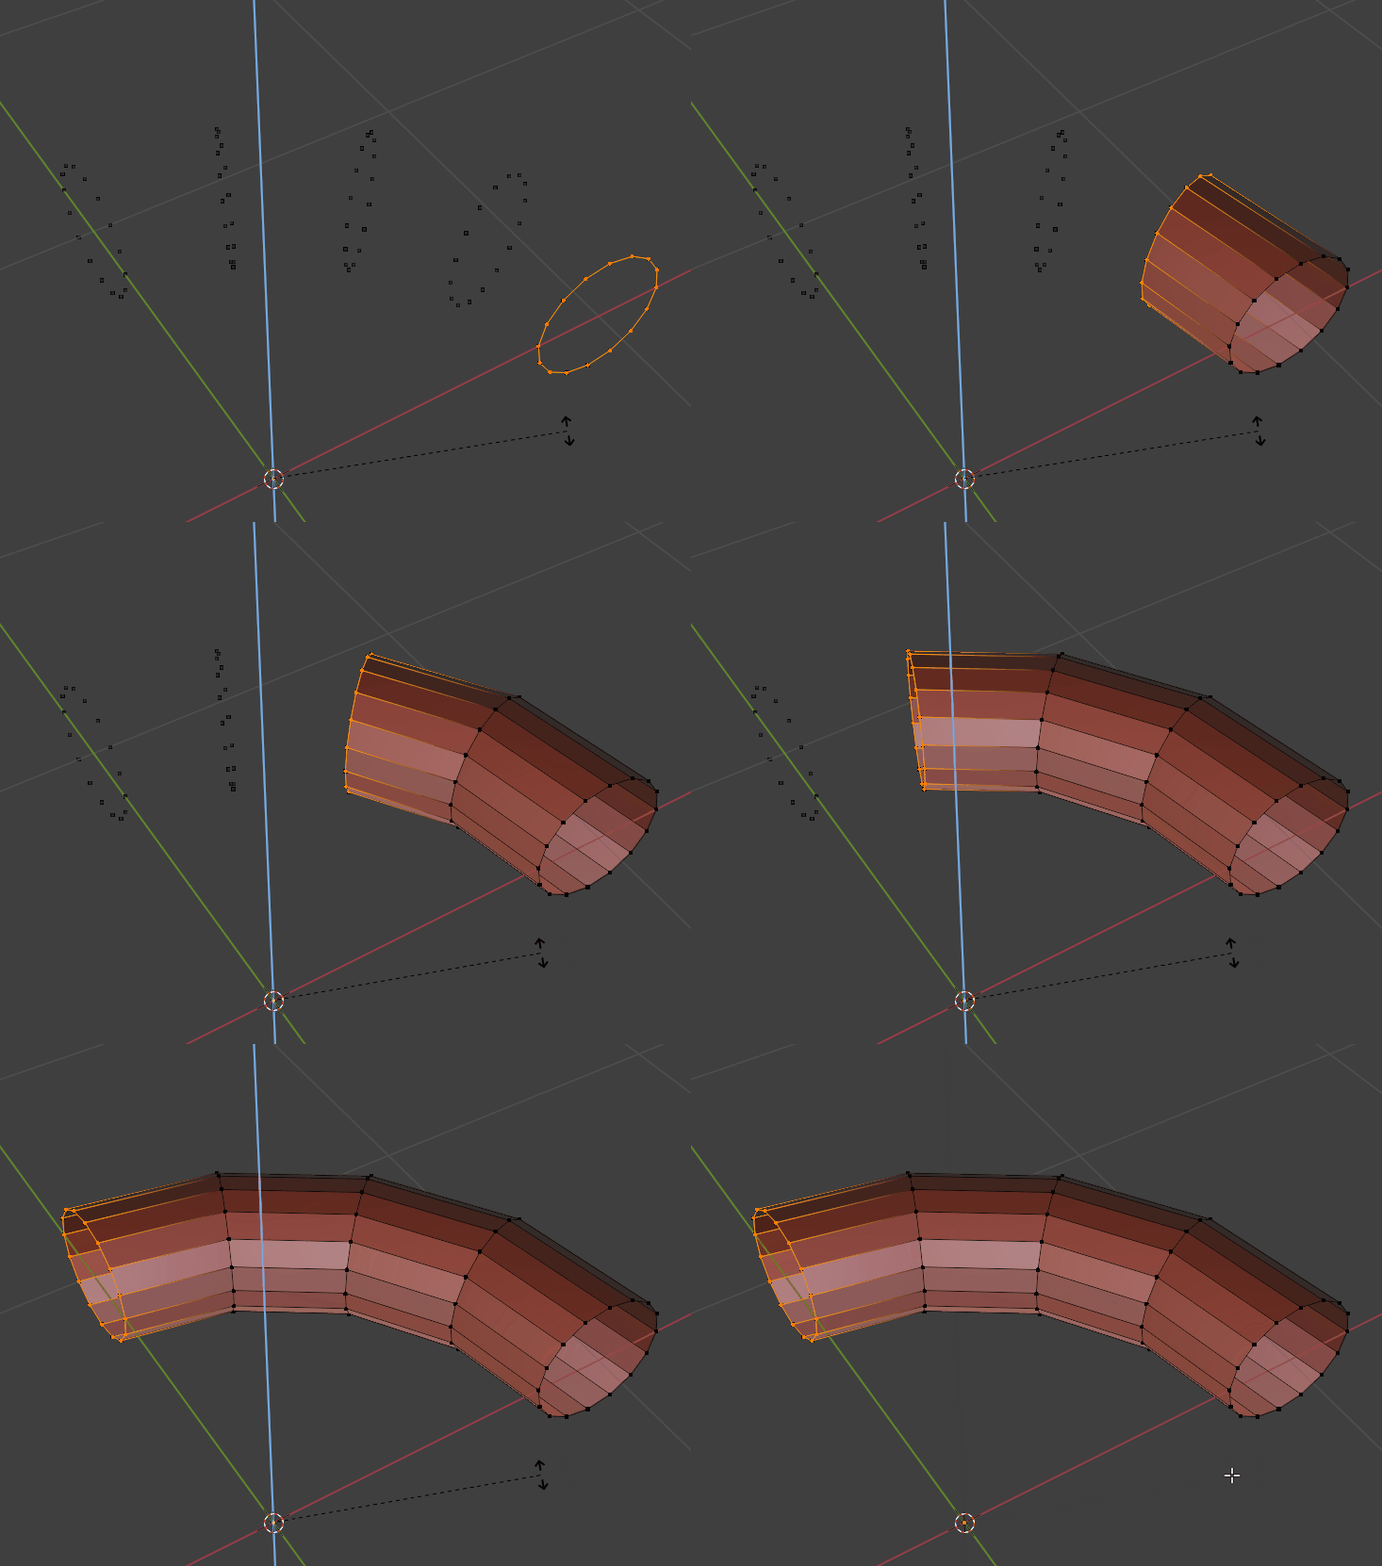
Of course we also have to fill in the end caps. Since all shapes are going to be convex, there is a simple method to accomplish this. We pick an arbitrary vertex 0, the next vertex 1 and the one after that 2 and connect them with a triangle. Then we add a triangle between 0, 2 and 3 and so on. The result looks like this:
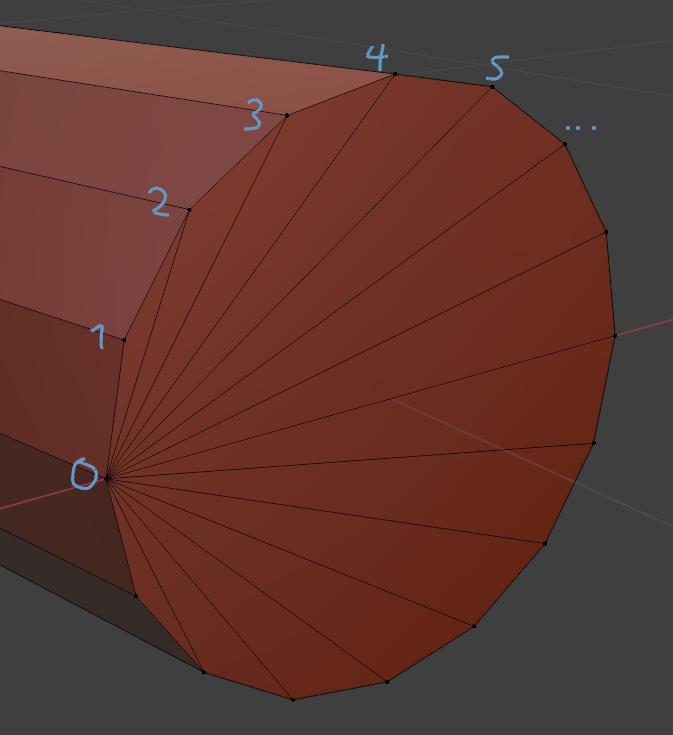
Now we have a runtime generated mesh that we can display. Yay!
Collision
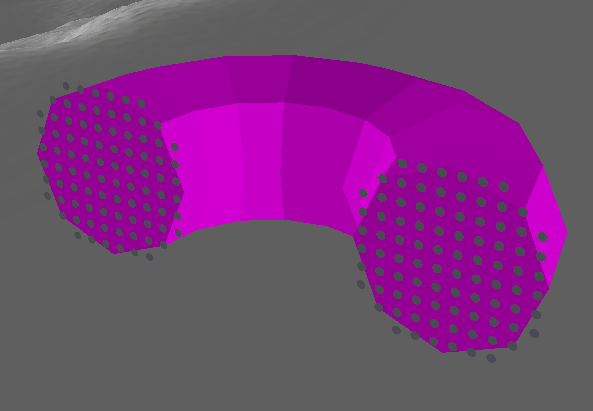
Spinner bricks are going to need to have collision geometry like any other brick, which will also have to be generated at runtime. Luckily this works much the same way as the mesh generation, just in a lower resolution with fewer vertices and slices. We also don’t need any triangles, each convex hull simply consists of the vertices of two slices.
Optimizations
At this point spinner bricks were implemented into the game and pretty much working, but were far from being optimized. The biggest issue was, that with the UProdecuralMeshComponent the mesh and collision data would be stored on each component individually and could not be shared between them. With a lot of spinner bricks this would result in a lot of memory overhead as well as slow down rendering significantly, because each brick would cause an extra draw call (UE4 automatically batches draw calls of identical static meshes, but not procedural meshes). I had an idea about how to fix this, but didn’t know yet if it would work.
Runtime static meshes
The idea was to generate static mesh assets at runtime and use them on normal UStaticMeshComponent’s. Since this procedure isn’t documented I had to read through the engine source code and a few forum posts to find out if and how it could be done. As it turns out, yes it can be done. And as usual with UE4, it is unecessarily complicated, requires a lot of code and a few workarounds.
// Create a transient static mesh asset
auto* NewStaticMesh = NewObject<UStaticMesh>(this, NAME_None, RF_Transient);
NewStaticMesh->GetStaticMaterials().Emplace(nullptr, NAME_Default);
NewStaticMesh->SetIsBuiltAtRuntime(true);
NewStaticMesh->bAutoComputeLODScreenSize = false;
NewStaticMesh->NeverStream = true;

// NOTE: Instead of calling BuildFromMeshDescriptions, we manually generate the mesh data here
// This is because BuildFromMeshDescriptions does a lot of stuff we don't need and can't control, like overwriting LOD distances
auto RecreateRenderStateContext = TOptional<FStaticMeshComponentRecreateRenderStateContext>();

// Release render resources if this mesh is being reused
if (NewStaticMesh->GetRenderData())
{
	RecreateRenderStateContext = FStaticMeshComponentRecreateRenderStateContext(NewStaticMesh, true, true);
	NewStaticMesh->ReleaseResources();
	NewStaticMesh->ReleaseResourcesFence.Wait();
}

// Init render data
NewStaticMesh->SetRenderData(MakeUnique<FStaticMeshRenderData>());

// Set up the number of LODs
NewStaticMesh->GetRenderData()->AllocateLODResources(NumLODs);
NewStaticMesh->SetNumSourceModels(NumLODs);
for (auto LODIdx = 0; LODIdx < NumLODs; ++LODIdx)
{
	auto& SourceModel = NewStaticMesh->GetSourceModel(LODIdx);
	SourceModel.BuildSettings.bRecomputeNormals = false;
	SourceModel.BuildSettings.bRecomputeTangents = false;
	// Set the screen size for each LOD level
	constexpr auto LODScreenSizes = std::array{1.f, 0.04f, 0.015f, 0.005f};
	SourceModel.ScreenSize = LODScreenSizes[LODIdx];
}

// Generate all LODs
auto MeshDescription = FMeshDescription();
for (auto LODIdx = 0; LODIdx < NumLODs; ++LODIdx)
{
	// Reset the mesh description
	MeshDescription.Empty();

	// Get and register mesh attributes
	auto Attributes = FStaticMeshAttributes(MeshDescription);
	Attributes.Register();

	const auto VertexPositions = Attributes.GetVertexPositions();
	const auto VertexNormals = Attributes.GetVertexInstanceNormals();
	const auto VertexTangents = Attributes.GetVertexInstanceTangents();
	const auto VertexColors = Attributes.GetVertexInstanceColors();
	const auto PolygonGroupNames = Attributes.GetPolygonGroupMaterialSlotNames();

	// Create a polygon group (mesh section)
	const auto PolygonGroupID = MeshDescription.CreatePolygonGroup();
	PolygonGroupNames[PolygonGroupID] = NAME_Default;

	// TODO: Add vertices and triangles here

	// Generate tangents
	FStaticMeshOperations::ComputeMikktTangents(MeshDescription, false);

	// Build the mesh description
	auto& LODResources = NewStaticMesh->GetRenderData()->LODResources[LODIdx];
	NewStaticMesh->BuildFromMeshDescription(MeshDescription, LODResources);
}

// Finalize the mesh
NewStaticMesh->InitResources();
Since the interface of the UProdecuralMeshComponent and this way to create a custom static mesh are quite different, it took a while to adapt the code and work out bugs like missing or inverted triangles. But after a while, it looked perfect. Now we have static mesh assets that we can share between all spinner bricks with exactly the same settings! Wait what? How useful is that with floating point size settings and a virtually infinite amount of different setting combinations? Well, not very…
After letting the issue rest for a few days I suddenly had an idea. This was going to make the implementation even more complicated, but could make things a heck of a lot more efficient.
Vertex shader magic
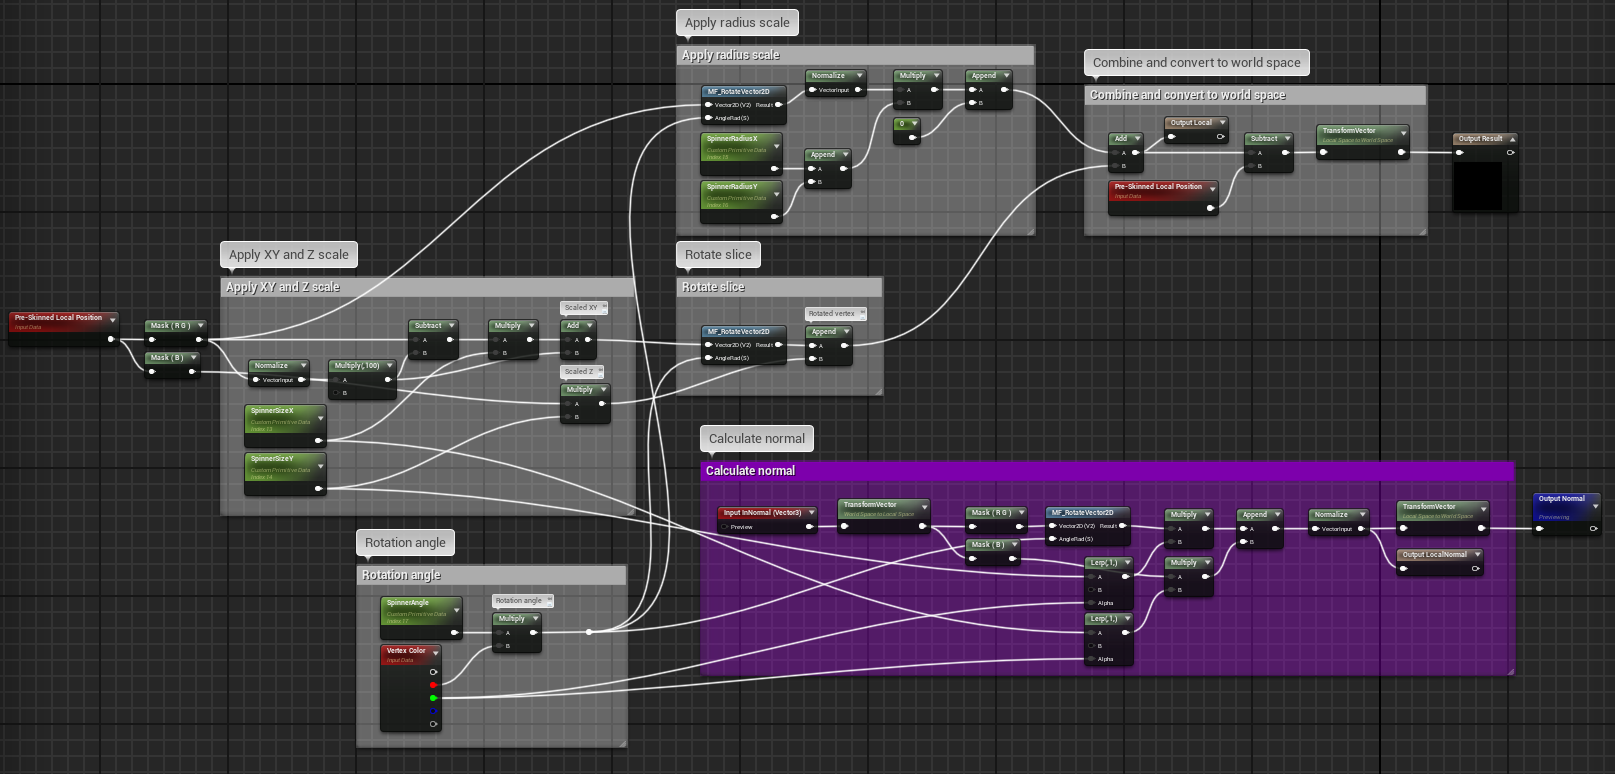
I realized that instead of having a potentially large amount of perfectly proportioned static meshes, I could have few template meshes that would be morphed to the desired shape using the vertex shader. Using the World Position Offset pin in the material editor, you can modify the visual position of vertices at runtime arbitrarily. As a result we only need around four unique static meshes with different vertex counts per spinner shape to interpolate angles between them. While I could manually create theses static meshes in Blender, I chose to use the runtime static mesh generation that I had already implemented.
This is what the material function used for modifying spinner brick vertex positions and normals looks like:
Unfortunatelly, a vertex shader is only going to affect the rendering of the mesh, collision will remain unaffected. So we have to use a custom UBodySetup for our UStaticMeshComponent’s, which can be done by overriding UPrimitiveComponent::GetBodySetup(). We can still share body setups of spinner bricks with the exact same (or very similar) dimensions.
Conclusion
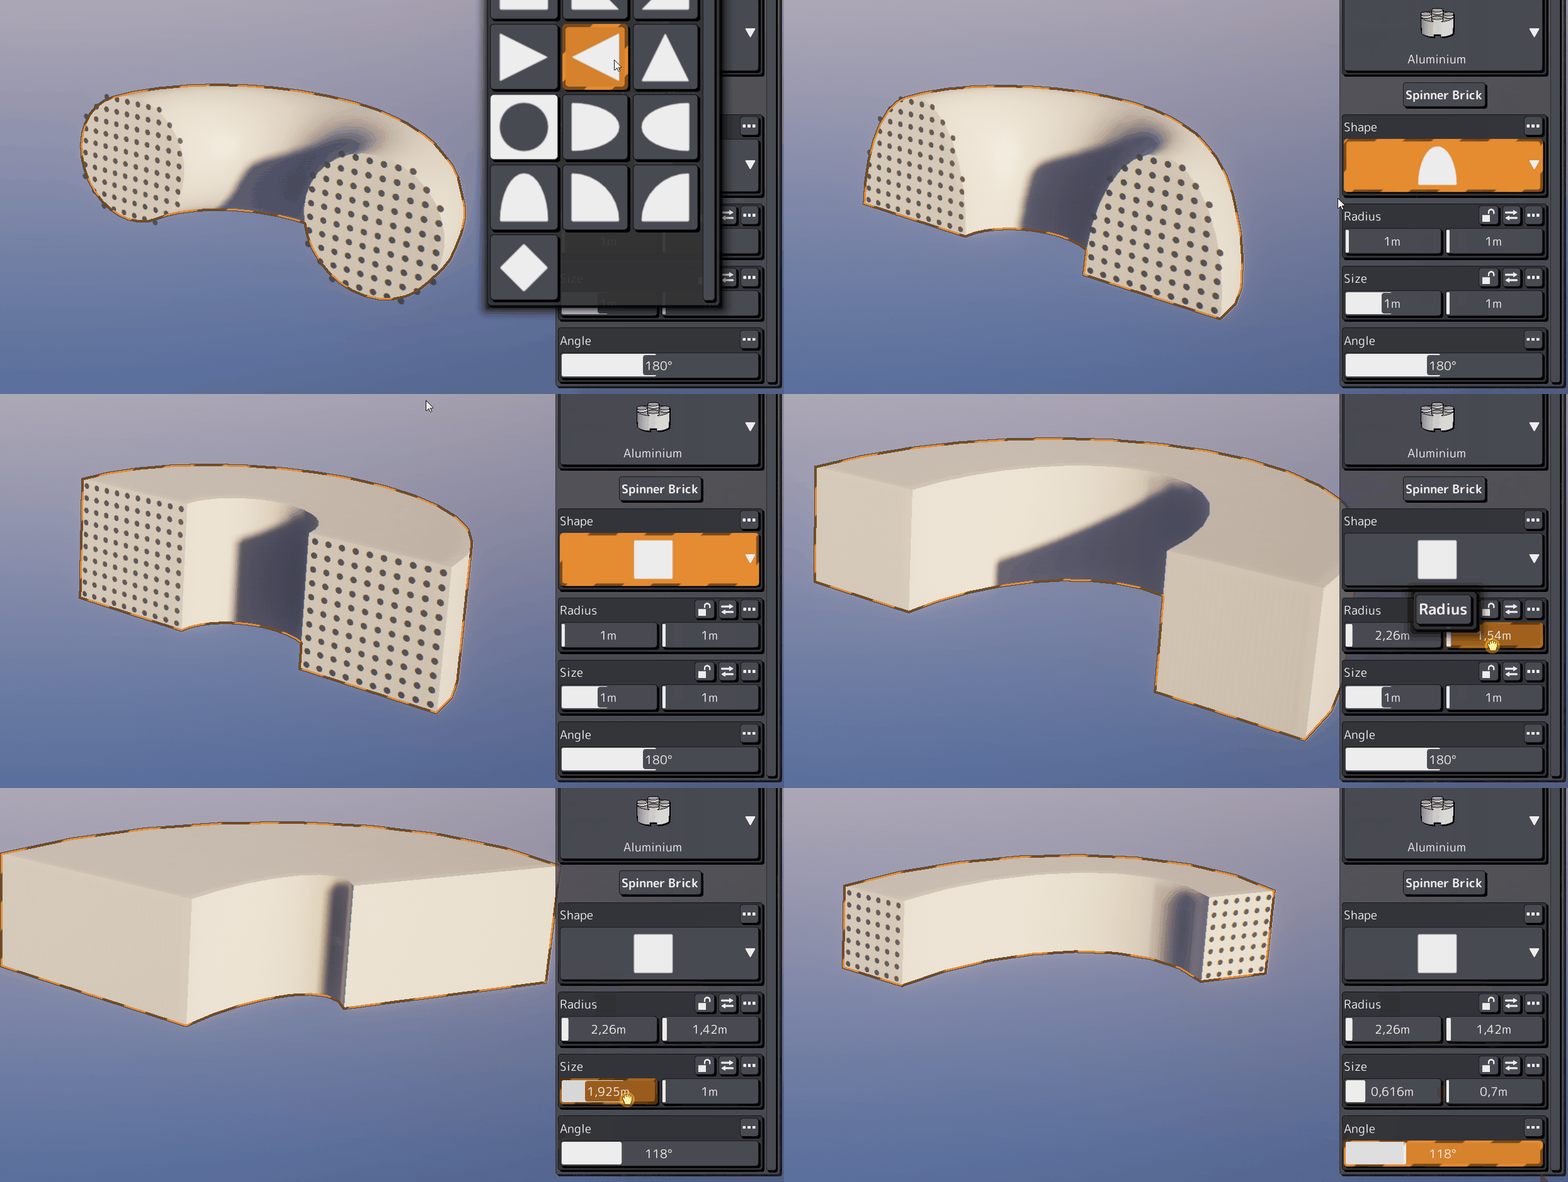
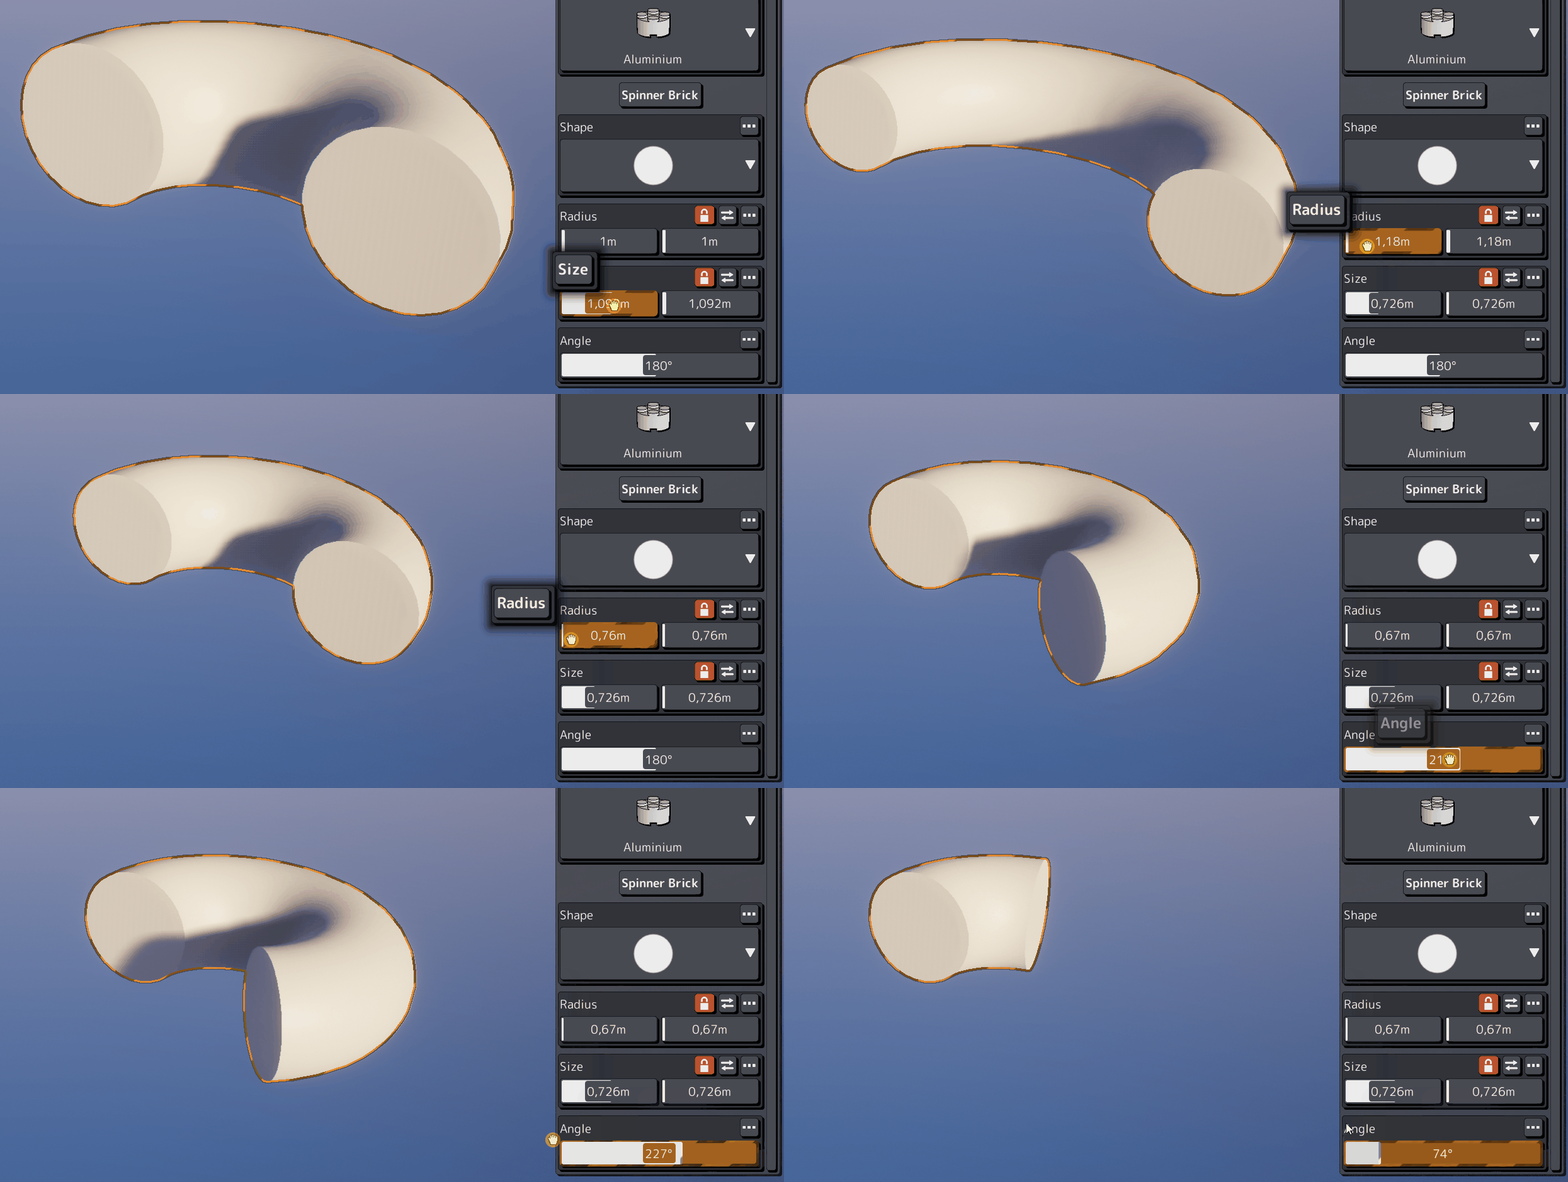
This is what the final result looks like. I can’t wait to see what kind of creations are going to be made with this!
